New fancy-pants camera. Check.
New fancy-pants lens. Check.
New fancy-pants portable photography light box. NEVAH!
OK, maybe not never ever, but certainly not right now. Why buy one when you can build one for under $20 (at the writing of this post)?
Especially, since I can whiz-bang that thing together in just over an hour.
How To Build an Inexpensive Foam Board Light Box


For those of you following the Shoot I Do photography series, the next one is coming, but I thought I’d throw this fun and inexpensive tutorial out here first.
Are you ready to build your very own light box for under $20?
I know you are!
~ A gentle reminder: OMT! uses Amazon referral links at no cost to you.~
Things You’ll Need to Build a Portable Light Box:
5 sheets of stiff poster board-sized foam board (Hobby Lobby)
1 package of Velcro (Hobby Lobby)
3 pieces of pearlized (no pattern) white vellum paper (Hobby Lobby)
Scotch tape
Hmmm, for a gal who gets itchy inside of Hobby Lobby, I sure did spend a lot of time there.
Building a Large Light Box for Photography
Number 1: Five sheets of foam board.
As you can see it’s thick. What you can’t see is that it is also sturdy.


Number 2: Velcro.
The Velcro package came with two ribbons of material. One fabric-like, one Velcro-y like.
This is the Velcro-y one.


Number 3: Cutting the Velcro
It had a sticky tape backing, so I simply cut to size and took off the protective backing, then stuck it to the bottom of three boards.
As you will see in a minute, the boards will be “standing” and this is the bottom portion with one side of the Velcro stuck in place.
Please take note of my imperfect cuts. The cuts do not have to be perfect.
JUST DO IT, BABY!


Here we have the other ribbon of the Velcro material…the softer material that will attach with a strong grip to the stuff I already stuck to my boards.


Number 4: Attaching the Velcro to the boards.
At this point, I have my original pieces stuck to the bottom and tops of my boards that will make up the backside of the box.
I’ve cut a longer portion of the second Velcro material to attach the pieces together.


Now my three pieces of boards are attached to each other and form the bulk of the box.
Success, they’re standing!


View from above, looking down into the soon to be completed light box.

Also note I constructed this box on the floor.
I likes to get all in it and building it on the floor allows me that fun.
Number 5: Slide the bottom foam board into three-sided light box.
In this next shot, you also see the bottom board which looks attached, but in reality I just slid it into place.
While I thought about cutting the side pieces to match the width of the bottom piece, it turned out just fine the way it was.
Feel free to modify yours to get a more boxy look.
See? Easy!
I decided to only attach the two side pieces and one back piece, while keeping the top and bottom loose, allowing me freedom to conform the box as I see fit.
At this point, I’m ready to cut some holes in the sides and top to let the light in.

Side Note: many DIY light boxes use tissue paper to diffuse the incoming light, but I knew that wouldn’t work for me because I’m kinda like a well-intentioned gorilla around fragile stuff. “Did I do that?!”
I knew I wanted something sturdier that could stand the test of Patti! So, I used a pearlized white vellum paper.
It’s very popular to use vellum on wedding invites. It’s a bendy, stiff, almost see-through paper. While vellum comes in all kinds of patterns, you want the pearlized with no pattern. Diffusing light is what you’re after. No patterns or colors, unless that’s what you’re after.
Because the only vellum I could find was the size of a standard piece of paper, I knew if I measured my hole the same size, the paper would be too small. Husband suggested I take a regular piece of paper, cut down the sizes a bit, then use that to trace for my holes. That way, when I places the vellum over the open spaces, it would cover completely without falling through.
Number Six: Measuring the vellum to fit the soon to be cut holes for the sides of the light box…(note the antique ruler!)

Cutting success! As you can see, the vellum (back piece) is bigger than the one I’ll trace with.


Number Seven: Cutting the light box holes.
After tracing, I went to work with my utility knife. Note the raggedness. This hole does not need to be perfect, but I’ll understand your OCD if you work to get it so. As for me: GOOD ENOUGH!

NOTE: While I would prefer bigger holes, until I find vellum in a bigger size than a standard sheet of paper, I had to go with what I could find. If I rigged two pieces together, the seam would cast a shadow, so that was a no-go.
Number Eight: Placing the Vellum on my portable light box.
I taped (using every day Scotch tape) the vellum to the outside of the sides and top.
Sometimes it’s the simple solution that works.
If you wanted you could use a stronger tape.
Number Nine: Reconstruct the light box.
I stood each board up and reconstructed my box by reattaching the Velcro, and BAM! ready for business.
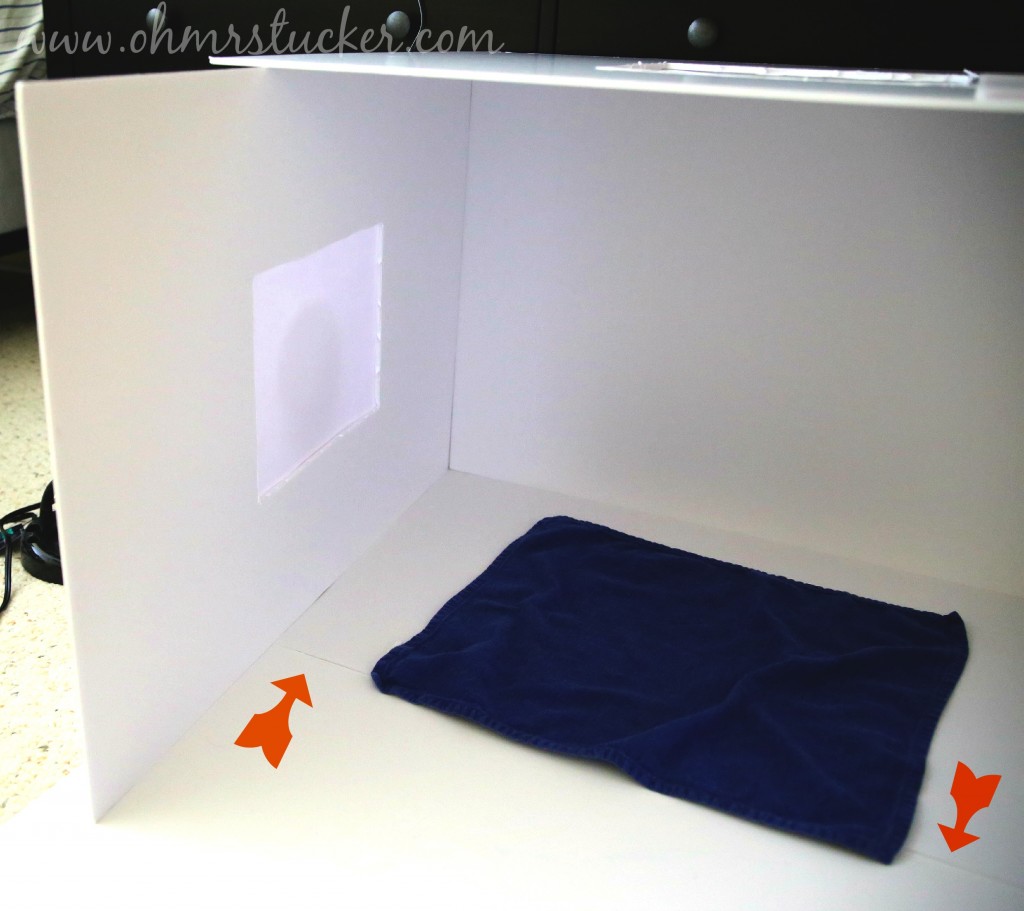
Also, remember how I didn’t cut the sides to match the width of the bottom piece? Well, I found if I slid in one more foam board for the bottom (I had two more…just in case) it gave me a larger field to work within.
The arrows are pointing to where the pieces of foam board abut.
In the future, I may cut down the pieces and center my side openings, but until then…this collapsible light box works just as I had hoped.

Number Ten: Placing a light source for your new inexpensive portable light box.
Your light sources can be small desk lamps that flex to fit your opening’s height.
While I’m using a light source from above, Boy has informed me that he has used a light box with success without a lamp above.
If you have great light from a window, but you’d like it a bit softer, you could place a vellum-side of the light box facing the window and use it to diffuse the natural light.
Either way – YOUR CALL!


Your DIY collapsible light box is ready for use!
I’ve used it for food photography and product samples with great success.
Typically, I’ll set it on a table in order to be able to maneuver when taking the photos.
You can turn towards a light source or away. Because the Vellum allows diffused light to enter and soften your images, you’ll find you are no longer tied to natural lighting for a photography session.
Storing your collapsible light box.
Because the light box is collapsible and made from sturdy foam board, it’s a breeze to store!
When I was done constructing the box, I simply unstuck the Velcro from the two side pieces and stacked all the boards and stored them in a corner standing up. (I’m keeping it real and didn’t clean up the area to make it picture perfect…this is how and where it’s stored!)


You can store under a bed, in a closet, or really, wherever you have a few inches of space.
The only thing I would advise is to keep the foam boards protected from bumps and marks that could affect your light. I have wrapped lightly in a sheet for protection and that worked fine.
My first photo using my simple light box.
Of course it’s food, because, that’s mostly what I shoot.
You’d eat it, right?

~faint~
- Construct light box.
- Adjust lighting to your preference (either using all diffused light from lamps, natural sources, or both).
- Place a backdrop down. In this case a dark blue cloth napkin.
- Shoot.
- If needed, modify lighting, then re-shoot.
- Collapse box and store.
- Eat pie.
Seriously, I told y’all this would be fairly easy!

Final thoughts on a DIY light box:
While I prefer natural lighting, some days or nights, it’s just not possible. A light box allows more flexibility when it comes to taking pics of ALL THE THINGS (well, all the food things) for this site…FOR YOU! I mean, why should I hog the drool?
When I saw the first test shots using the box, I was relieved and giddy all in one. Relieved that I didn’t ruin the box with my bull-in-a-china-shop ways and giddy because, well, there was Cheesecake Pie in my light box!
See how easy it is to make a simple lightbox?
If I can do it, you can do it, pinky-swear.
Get to constructin’, shooting, and eating, mah babies!
~ Original Post: April 16, 2014 ~ Updated Post February 12, 2021 ~
The post DIY Portable Photo Light Box first appeared on Oh, Mrs. Tucker!.